Every team can have a public website at its own address, like late-arrivals.improvteam.com. You write it as a draft, see a preview, and publish when you are happy.
Build it
- 1
Open the team, then More, then Website. It is also a row in Settings.
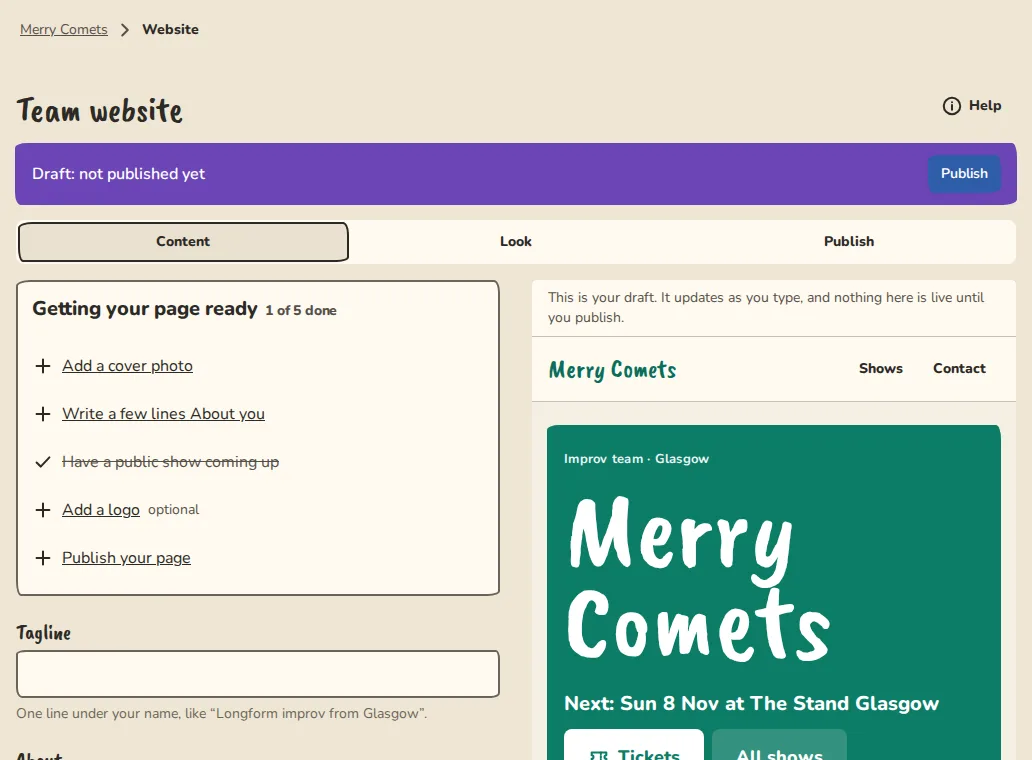
The website builder on a computer: the draft status, the steps Content, Look and Publish, and the preview. - 2
Content: add a cover photo, a logo, a team photo and a gallery, a Tagline, a few lines About you, and a featured video from YouTube or Vimeo.
- 3
Still under Content, tick any Files and links from Resources to show them, like a press kit. Nothing is public unless you tick it.
- 4
Look: pick a Layout (Poster, Notebook, Chalkboard or Minimal), an Accent colour and a Background. Below that, drag the box over your cover photo to crop it (the corner resizes it; with a keyboard use the arrow keys, and Shift with the arrows to resize), choose where the logo goes (left, centre or hidden) and how big it is, and switch on a colour bar across the top.
- 5
Brand: switch on Use a brand on my pages to pick fonts for headings and text, an accent colour (the page checks that white text on it stays readable and deepens it if not), button style, corners and spacing. The same brand is used on your show, festival, theatre and course pages, as the starting point for your posters, and in the emails your group sends. Sign-in and account emails always keep the ImprovTeam look.
- 6
Your words save as a draft while you type. Tap Preview to see the page as visitors will.
- 7
Publish: under What's public choose whether to show upcoming shows, practices, the cast and a contact form.
- 8
Tap Publish. The page goes live, with Copy link, Share to WhatsApp and a QR code for posters.
Pages and sections
A site can have a Home page and as many more pages as you like (up to 12), each with its own menu entry, address and title.
- 1
Pages: pick a starting template for your kind of group (a theatre or school, a festival or a team), or add pages yourself. Each page has a title, an address (like /p/classes), Show in the menu and optional intro text.
- 2
Sections: choose a page, then switch sections on or off and move them up or down. Shows, Classes and courses, Workshops, Auditions, News and Venue and access fill themselves from your group, and hide when there is nothing to show.
- 3
Add your own sections: a Text block, Questions and answers, Instructors, Gallery, Contact, Social links, Support. Switching a section off keeps its words, so you can switch it back on.
- 4
Instructors have their own small editor (Add or change instructors): a name, role, short bio, a photo and up to three links each. Only add people who agreed to be listed.
- 5
Text is plain with a few marks: a blank line starts a paragraph, **bold**, *italic*, [link text](https://example.com), - for a list and ## for a heading.
- 6
Pages stay in the draft like everything else: a new page is not on the live site until you tap Publish.
For drop-in groups
An open (drop-in) group builds its site the same way, with sections made for newcomers.
- 1
Pages: pick Simple drop-in (one page) or Drop-in with a guide (Home, New here? and Where and when).
- 2
Next sessions lists your upcoming public sessions with a sign-up button and how full each one is: Places left, Nearly full or Full, join the waitlist. The page is kept for a minute or so, so it only says these words; with JavaScript the exact number appears as the page loads, and the session page always has the true count.
- 3
Your first time holds your short answers to what newcomers ask. It starts with wording you can change; empty answers are not shown.
- 4
What it costs is your own words, plus a line about the room split when your group splits a room cost. Code of conduct shows the first lines of your published code. Hosts stays hidden until you switch on Show hosts under Publish.
Change it later
- 1
Edit anything. The status says Changes not published and the live site stays as it was.
- 2
Tap Publish again when you are ready.
- 3
Take the page down switches the address off. Your words and photos are kept.
Your own address
This is optional. Show the page at an address you own, like www.yourteam.com. The improvteam.com address keeps working too.
- 1
On the Publish step, under Your own address, type the address and tap Connect domain.
- 2
You are shown one DNS record, a CNAME. At the company where you bought the domain, add it exactly as shown.
- 3
Wait a few minutes, sometimes up to a day. Tap Check now. The padlock appears by itself once DNS is right.
Old links
If you moved to ImprovTeam from another site, people still follow your old links. Tell us where each one should go.
- 1
On the Publish step, under Old links, tap Old links. Type the old path (like /old-page) and the new page (like /courses), then tap Add. You can have up to 200.
- 2
We only use a redirect where the page does not exist, so a page you have never loses to an old link. Pick Permanent (301) for a page that has moved for good, or Temporary (302) if it may come back.
- 3
The new page must be on your own site, or its address on your own domain. We will not send people to anyone else's site, and we refuse two redirects that point at each other.
Good to know
What it doesn't do yet
Try it in a sandbox
Make a private copy with made-up people and follow these steps without changing anything real.
Still stuck?
Write to us from the contact page. Say which page you were on and what you tapped.